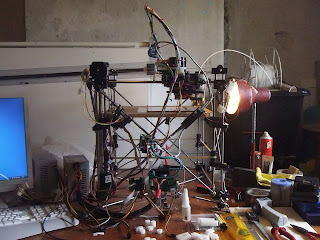
Wednesday, 16 May 2012

I feel the need, the need for speed

02/05/2012

As I was having major progress with Pronterface and SFACT I thought I had better build a good latest release version rather than the stable distribution version I was currently using, not expecting much other than an improved pronterface GUI I was stunned to discover a marked increase in quality again, a couple of large prints later (still trying to eliminate warp)  and I had the idea that now the machine is “Working” I could test increasing the X/Y speed a little moving away from the extreamly slow speeds I had set so that I could see what was going on.

So I doubled the Main feed rate to 20 and the perimeter Feed Rate to 20 and the travel rate to 40 (I chose these values as they are the minimum that pronterface will allow you to select using the dialog rather than typing in specific values)

And to my amazement I again witnessed a marked improvement in quality especially when printing objects with bridges in them. (obvious really as it gives less time for the filament being printed to sag before arriving at the far side of the bridge)

Must be careful not to push the speed to much as I know that the machine skips badly when using main feed rates of 60 or so as these were the defaults I had to ditch to get the printer to work in the first place, also the Darwin is using resin cast bushes as far as I can tell, I want to replace these with linier bearings ASAP so I can really start to play with the speed of the printer and explore its limits.

There are a host of mechanical issues with the Bootstrapped Darwin detailed below

1)     I still have major mechanical issues with the Darwin Z axis design, some parts on thingiverse should address this (reference parts)
2)     The X & Y Carriages are using what look like cast resin bushes these need replacing with linier bearings
3)     The Y Axis top end corner mounts are also using cast resin bushes other upgrades on thingiverse will address this
4)     The Z axis uses cast resin drive gears (4 of them) for which I have no printable replacement! So this is a fairly major flaw as if one of these fails printing stops dead! Need to replace these with real metal gears as the drive belt is a 2.5 mm type and so as far as I know can’t be printed .
5)     The Z axis drive belt is a mess and needs replacing (teeth missing 2 super glued joins) after a breakage, I won’t attempt this until I have some of the Z axis upgrades printed (namely the 608 corner bearing holders, reference part)  as this will change the length of the timing belt.
6)     The Z axis drive linkage is a bodged piece of petrol hose with 2 hose clamps this needs a printable Z linkage (again I am not going to attempt this until  the Z axis corned screw threads have been fitted with 608 bearing housings and made true and properly square) amazingly this bodge seems to be holding up remarkably well considering how long it has been driven.
7)     The X axis idler is again a cast resin bush, can’t find any upgrade that addresses this but I don't think it would be difficult to replace with a 608 bearing and 2 large wide washers as used in the Prusa design. I will need to address this one fairly soon as the current resin bush makes creaking sounds ( I think it has cracked down one side and this is causing the creaking sounds, it will probably fail soon prompting me to upgrade to the bearing & washer solution)
8)     It would be good to move the electronics into more stable positions as one of the stepper drivers is currently floating in free air and moves a little as the Y axis moves, this will eventually lead to copper wire fatigue and failure. Also the stepper that drives the extruder motor is literally zip fastened to the bundle of wires that feed the extruder controller it needs mechanically fixing to the same bracket the extruder controller is mounted on.
9)     Z axis needs a proper belt tensioner, currently bodged with my solder sucker zipfastned to a lump of wood solution. Can’t seem to find any Darwin style belt tensioners on Thingiverse might need to email Adrian Boyer on this one and beg the .stl’s for his design.
10)   The Gregs accessible wades geared extruder is crudely bodged onto the Darwin “Quickfit dock” and again I can’t find any stl’s for the quickfit dock on thingiverse or anywhere else on the web will mention this in the email to Adrian to see if I can get that one as well.

Anyhow it’s about this time that I need to start learning to use a CAD program to design my own parts rather than just printing other peoples.

Geared extruders are the way forward

29/04/2012

Ordered a “Gregs accessible wades geared extruder” from eBay for about £21.00 for the 4 printed plastic parts plus a bag of mechanical fixings to fit, a bargain in my opinion, after assembling it and following the online instructions on how to connect it to the Gen 3 setup I have, a short frenzy of soldering & butchering of some old PC CD/Audio cables I had laying around and suddenly things had evolved.

 Gregs accessible wades geared extruder
 
The difference between the old Darwin style extruder and a Geared extruder meant that no longer am I hacking at the system now I have complete control over the extruder mechanism.

Seeing as pronterface is turning out to be the way forward I found an followed another of Spacexula’s excellent you tube videos on cow to calibrate your  “E steps per mm” for both the 3 axis and extrusion length, this cured the size of print issue as the Mendel axis defaults were almost exactly half what they should have been for the Darwin style steppers, the e steps for the extrusion length are set low deliberately to allow you to calibrate for any style of extruder, and after calibrating all 4 of these steps.

Began tinkering with the SFACT slicer settings in Pronterface and discovered that there are loads of settings I am going to have to get my head around.

Now the system was extruding reliably I was much more able to see exactly what was happening and after another print of the widebar I let it run and voila on the second and third layer things were starting to work, I was beginning to suspect that it was skipping steps on the Y axis after the first layer, lowered the speed setting considerably in SFACT and bang we were printing!

The next print of the widebar and finaly it looked like I may have cracked it, after letting it run my heart sank again as I realised that the Z Axis was not moving, it was skipping/stalling somehow, a long web read later and I had an inkling that it may be something to do with the “limit” settings in SFACT apparently as I am using old firmware Pronterface can’t limit the Z axis speed, Sprinter and Marlin firmware is supposed to cure this issue (will have to investigate these firmware’s) as they allow the Z axis speed to be controlled by host program (still not sure I get this completely but hey at least the Limit  tab in SFACT should allow me to get the Z axis moving.

A few more attempts at a Wide bar and I discover that I need to set my Z axis speed limit to 1mm/min not the 5mm/min default value and at last the z axis begins to move as expected.

To my amazement the Wide bar prints perfectly!


To excited to contain myself I now find myself cruising Thingiverse for the first time in the realisation that I now have a “working” 3D printer.

Downloaded a load of calibration objects, Darwin parts/upgrades and of course a “Gregs accessible wades geared extruder”

Here are the SFACT value’s I have discovered work for my particular Bootstrapped Darwin setup

Speed - all feed rates = 10, all flow rates = 1.5


Altivate Limit - all feed rates 1.0
Cool - activate cooling if small or thin parts (Cool on large parts causes warp)
Raft - Deactivate Raft
Carve - extrusion width 0.5

I spent the next month attempting all of the printed plastic parts for a Prusa Mendel, (the 1st child printer) discovering that I will probably need fans, maybe a heated bed (if I want to print ABS)
 
 
Printing parts at last!
 
Small cogs look good on the side being cooled by the fan but the far side obviously needs cooling also as it is a mess

After much frustration messing about with fans I had the idea of just increasing the number of small parts printed simultaneously, then as far as the printer is concerned this is a large part and therefore gives plenty of time to cool between layers.

Tested this theory by printing 2 small cogs at the same time using the multiply function on SFACT and hurrah it worked a treat

Large parts still seem to suffer from some warping this may be due to the fact that my spare room where I am running the Darwin is very cold and draughty < 10 degrees C, I have a plan to move the machine completely out of the house and into my workshop (which is currently an impromptu builders yard) but this will take a lot of clearing and reorganising.

I still have major mechanical issues with the Darwin Z axis design, some parts on thingiverse should address this (reference parts)

The search for software

03/03/2012
OK so I decided to search around for some software installation guides, found spacexula’s great video on you tube on how to setup Pronterface with SFact, Pronterface being the host control program and SFact being a derivative of Skienforge the slicing & GCode creation software.

Followed the guide to the letter (also discovered freenode IRC in the process of following this guide, this will be useful later I am sure)

Also reversed the extruder coil wires to fix the extrude direction issue.

 Tested Pronterface with SFact and to my amazement it works (well sort of) this is the first time since I upgraded the electronics from PIC to Gen3 that the machine has responded to a print by attempting to print something.

I was using the widebar .stl from the RepRap Wiki tweaking page, and the first layer looked extremely promising, firstly the machine lays down an outline/border to encompass the whole object being printed, it then attempted to print the outline of the widebar followed by diagonal infill, this all looked great, and other than the fact that it was moving so fast that the whole machine was shaking and wobbling from the inertia, another big step forward.

After examining the aborted (after second layer) print I concluded the following.

1)     Extrude speed not correct (my bodged stepper motor onto DC style extruder screw thread feed mechanism will need some serious firmware tweaks as the Mendel firmware is expecting a Geared extruder mechanism)

2)     X Y & Z speed way to fast (after a quick look at the firmware I found the stepper settings for a Darwin were different from the default Mendel settings, commented out the Mendel settings and copied the Darwin Stepper section down from the Darwin settings above in the configuration.h file, this did slow things down but did not appear to change the scale of the object being printed. And I may be wrong but the widebar seemed a little small)

3)     I really need to get a geared extruder!

OK so  after I had tinkered with the extrude speed a little I discovered that the manual extrude button in Pronterface exhibits weird behaviour, about every third click it would spin the extrude stepper for a reasonable amount but the next two to three clicks just give a stalling stepper sound (not good) this is definitely a software issue (although it looks like the stepper is jamming) as if I switch to using Repsnappers manual control the extrude button works fine every time and gives a pretty reasonable extrusion (after I lower the extrude speed and length considerably) proving that the extruder is not mechanically jamming.

Seeing as my only remaining serious mechanical issue is control over the extruder I decide to by a geared extruder mechanism.

Fun with firmware

I have spent the last week Ill and off work (too sick to do any RepRap) but I did manage to spend some considerable time the previous week/weekend playing around with configuring the RepRap FiveD firmware, and this is what I have discovered.
1)     I am a moron! Yes in order to use the RepRap FiveD firmware you first need to setup the configuration.h file properly to describe your Machine as best you can.

2)     RTFM! After much more web reading I have managed to get the reprap FiveD firmware configured as a Gen3 Mendel, this immediately enabled me to use Software such as RepSnapper, Reprap Host, and ReplicatorG using the FiveD driver, hurrah at last this is the sledgehammer to the brick wall that has been blocking my progress for a while.

OK so now I finally have comms using the FiveD driver things have started to work a little more as expected, firstly I have RS485 comms with my EC (yey), secondly I can monitor the temperature (although it needs calibrating) turn the cooling fan on & off, and turn the heater on and off. (that is major progress from where I was recently)

So next I spent some time wiring up the extra stepper driver board I have. (bought from Techzone along with my EC)
This worked like a treat from the off. (sweet!)

My next issue was that although I had EC comms & control sorted I had gained a serial comms issue with the motherboard.

Suspecting a firmware issue I began rolling back through the RepRap FiveD firmware releases until I came across 1 from mid-2010 that did not have the serial comms hanging issue.

Darwin style "screw thread" extruder mechanism
 
So at this point I “appeared” to have full control of my machine time to finish putting it all together, now I don't as yet have a geared extruder of any kind and was hoping that I may be in a position soon to print one, So I have proceeded to bodge the now working extruder stepper motor onto my existing Darwin style screw thread extruder mechanism, apart from the stepper turning the wrong way and having used more zip fasteners than you can imagine thing are starting to look like they might actually work!

However I soon discovered that although I have full control over each independent part of the machine using the manual controls as soon as I began to load STL’s and attempt to print something more issues arrived.

RepSnapper seems to send GCodes to the machine and merrily tell me that it has completed after having only moved the XY & Z a little, it’s almost like the codes are being sent and received but acknowledgement of the code being received is interpreted as G Code sequence completed!

Reprap host just hangs when I attempt to print, the community are warning that the latest release is not good, & RepG does well nothing when I print (but this probably has more to do with me not knowing what I am supposed to do to print using RepG.

All in all I am amazingly close to actually printing something, at least all of the software seems to be working (ish) I think my issue is now I am finally at this stage I need to do a lot of catching up on how you are supposed to use GCodes to print, I realise that there is an intermediary step when using GCode’s and that is the slicing or GCode conversion element.